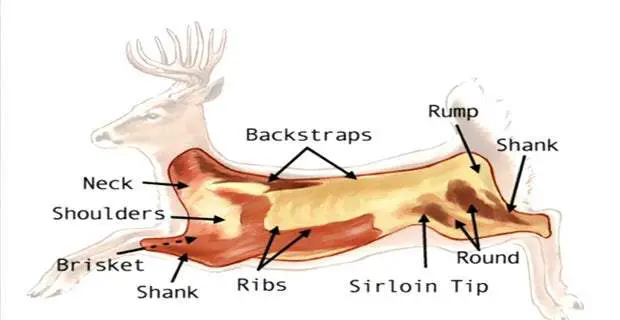
Skinning and butchering one’s own deer save money and ensure that the process will be undertaken more cautiously.
Plus, it’s supremely satisfying.
Let’s find out how it’s done.
How to Skin a Deer
Here’s the step-by-step process for you.
1. Field Dressing
This is the process of removing the entrails and should be the first priority. The process preserves the body heat, which ensures bacteria won’t grow on the carcass’s surface.
2. Positioning
Using your cable hoist, hang your deer upside down. Lower it so as to make the hams level with your eyesight. The head of the deer should be touching the ground.
3. Skinning
Take up a high-quality deer skinning knife and start at the deer’s groin. Slip up the point of the knife under the deer’s skin with the blade facing upwards. Now cut a slit upward from the bottom of ham to at a point past the knee. Repeat on the other side.
4. Peeling
Use your skinning knife to loosen the deer’s skin. Cut the distance around each joint. Now, peel the skin from the deer’s back legs to its tail. Next, cut off the tailbone and peel down to the front shoulders.
5. Cutting the Legs
Take your shears and cut the deer’s front legs off from the knee.
6. Peeling the Legs
Now it’s time to turn to the chest opening. Create a long slit from the inner legs to the point where the leg was cut off. Now peel the legs, then the shoulders, then down to the base of the neck.
7. Beheading
Use your knife to slice through the neck of the deer. Then, use your bone saw to cut through the spine.
Butchering the Deer: First Half
Let’s go through the process step-by-step.
1. Butchering the Shoulders
The butchering of a deer always begins at its front shoulders. Pull it away from the deer’s torso. Your knife blade should be parallel to the rib cage when you’re cutting; this will allow you to go through the joint at the shoulder.
2. Butchering the Back Straps
First, you need to shave away any excess fat in this area. Next, locate the knobby point of the hip bone. Cut under the hip bone and the backbone on either side.
Once this first cross-section has been created, now you must cut down along the backbone, all the way through the neck. Now, you may begin peeling so as to free the back-strap from the deer carcass.
3. Butchering the Neck Meat
Remember the incision you made for the deer’s backstrap? Pull the meat back from there and skin off of the neck bone. Work at it from the top of the neck down to the windpipe.
4. Cleaning the First Half
By this, we mean the front half of the deer. Meat found along the rib cage can be carved out to make ground meat.
5. Sawing the Backbone
This will leave you with the deer’s hindquarters. Onto the next half!
Butchering the Deer: Second Half
To make things easier for you, here’s the step-by-step process.
1. Cutting the Sirloin
To do this, start at the hindquarter knee. Your knife must be parallel with the leg bone until the hip is reached. To finish off the cut, turn your knife 90 degrees.
2. Take out the Remaining Hindquarter
In this step, the hindquarters have to stay attached to the deer’s pelvic bone. Begin with the rear of the leg and just under the Achilles tendon.
This cut has to be worked around the knee so as to free up all the meat from the pelvic and leg bones. The resulting roast meat will be made up of the rump roast, eye of round, and bottom round.
3. Bone out the Hindquarters
Now it’s time to take out whatever meat has been left in the hindquarters. These cuts tend to be perfect for ground meat or stews.
4. Boning out the Front Shoulders
The upside-down T shape of the shoulder bone makes it so that you have to cut carefully.
Don’t use any cheap boning knife, that will get your catch ruined. Read this article to find out a high-quality boning knife.
5. Trimming
Trimming is the last step of the process. Get rid of excess fat, shiny/slippery skin, and tendon.
Conclusion
Skinning and butchering your deer is a time-consuming task that requires much practice, so be patient. May your venison always taste perfect. Good luck!

